- Setting up a Self-Hosted RustDesk Instance
- Jonathan Haack
- Haack’s Networking
- webmaster@haacksnetworking.org
//rustdesk//
Latest Updates: https://wiki.haacksnetworking.org/doku.php?id=computing:rustdesk
This tutorial is for users of Debian GNU/Linux who want to setup a self-hosted RustDesk instance. This tutorial is designed for a public facing instance/domain which uses an apache2 reverse proxy to serve TLS requests back to the gohttp server listening on port 8000. TLS certs are handled by Let’s Encrypt and cron. This tutorial also covers where and how to obtain the API key and other parameters needed for switching RustDesk clients over to the new self-hosted relay. Before proceeding any further, make sure that port 22, 80, and 443 are already open / firewalled as you see fit and that you have already exchanged ssh keys, assigned an A record to your public facing domain, and have a bare bones LAMP stack installed. Once that’s done, let’s begin.
ufw allow 21114:21119/tcp
ufw allow 8000/tcp
ufw allow 21116/udp
sudo ufw enable
Download the installer, make it executable, then run it:
wget https://raw.githubusercontent.com/techahold/rustdeskinstall/master/install.sh
chmod +x install.sh
./install.sh
You can always download the package as a .deb and install it directly. The RustDesk Repository has the latest amd64. You just wget to download it and then install it with dpkg -i. I did this by accident at first thinking it was another step, but it is actually an alternative method. Do note that if you take this approach, you will need to set up the hbbs/hbbr environments manually. That seemed even more annoying than docker. So, after reviewing the code and discussing the project with members of the pubglug community, I decided the script was just fine. The script prompts the user with two questions. First, do you want to be IP-based or domain-based, I chose domain. It also asks if you want to set up the http server; I chose yes. After the script was done, I went ahead and focused on setting up apache2’s reverse proxy configs.
Use the configs above and adapt to your needs. However, before you put them in place using a2ensite, you should first setup TLS for your domain using the default virtual host. Leaving 000-default.conf as the active virtual host for now, run the following commands:
sudo apt install certbot letsencrypt python3-certbot-apache
sudo certbot --authenticator standalone --installer apache -d site1.com --pre-hook "systemctl stop apache2" --post-hook "systemctl start apache2"
Once this completes successfully, you want to disable both the default virtual host called 000-default.conf and the Let’s Encrypt generated one called 000-default-le-ssl.conf.
sudo a2dissite 000-default.conf
sudo a2dissite 000-default-le-ssl.conf
Please note that these are example virtual host names, so adjust to your OS / distro accordingly. Once all virtual hosts are disabled, you want to take the reverse proxy configs above (not the ones you just disabled, rather, the ones above that I cited in the intro) and copy them into /etc/apache2/sites-available/. Make sure to edit each and replace the example domains and ports with your FQDN and your port, presumably 8000. Additionally, make sure you have the required php modules enabled before restarting apache2’s service:
sudo a2enmod proxy_http
sudo a2enmod proxy
sudo a2enmod rewrite
sudo a2enmod headers
sudo systemctl restart apache2
sudo a2ensite apache-rustdesk-domain.com.conf
sudo a2ensite apache-rustdesk-domain.com-ssl.conf
sudo reboot
If you did everything correctly, your server will now load at https://fqdn.com without entering a port, as it will be handled by apache, which in turn passes it back to gohttp server running your RustDesk instance. This ensures that you communicate with the external instance using TLS, and that only the apache2 TLS communicates back via the proxy with RustDesk using http. Thus, only apache2 via TLS is publicly exposed, and by extension, this means when you set up your clients and the API key, you are sending/receiving all these sensitive remote desktop sessions across a TLS encrypted session. Make sure that you have Let’s Encrypt cert renewal attached to an appropriate cronjob. Once this is in place, you need to setup the clients. Download RustDesk from the main website, and then adjust the following settings with the following information.
cat /opt/rustdesk/id_ed25519.pub
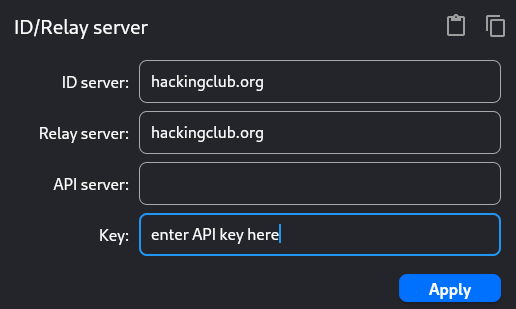
The output above is your API key. On each client that you want to use with this server, you open the RustDesk client, unlock Network Settings, and enter this key into the parameter called “Key.” In the sections above, enter you FQDN.tld without http:// or https://. Here’s an example:

Personally, I choose to use both one-time keys and set/static passwords for the connections, but those are personal preference decisions, so I won’t detail that here. From here on out, just make sure to set up all other clients equivalently and you are all set. After you confirm all is working, you can test to see if RustDesk was indeed using your new self-hosted relay by attempting to use it when your VPS is powered down. Once you attempt this and it fails, you know you are good to go. Hope this helped other Debian users who want to use and set this up without using docker!
Thanks,
-oemb1905